Below are some instructions for what might be the world's most simple frame box suitable for baling hay by hand. I've written these to accompany an Organic NZ article on scything, due for release in March 2019. Please do read the caution at the bottom of the instructions. I used to think our baling box was perfect, but, you know, the old grey mare, she ain't what she used to be. Even though I'm not yet greying!
To take the snapshots accompanying this post, I ran out to the hay barn in the early morning on a cool and moist day, and OMG! I consider myself well paid for the trouble. The smell of fresh hay has to be among my most favourite in the world. And on the way back in, the smell of spearmints growing out from under the porch ... Sigh. My great-uncle was a commercial spearmint farmer. My grandpa was a millworker, but he had a side business baling hay. For me, mint and hay are among the most quintessential smells of home--that and the acid smell of mama bottling enough summer tomatoes to keep us going for the whole year ...
Back to the point!
Build a simple baling box
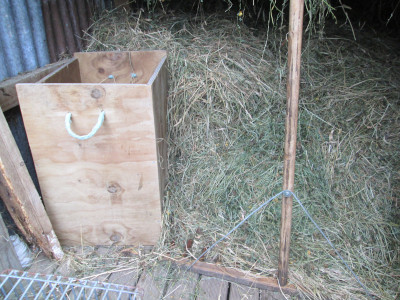
Our baling box is a simple rectangular prism, open at both ends, and built with 19mm plywood. The design’s dimensions are adjustable: the size of your prism will be the size of your bale. You do need thick plywood (see step 4). Our dimensions are given in the instructions below.
1. Cut two 40cm x 60cm pieces of plywood for the front and back.
2. Cut two 50cm x 60cm pieces for the sides.
3. Align the four cut pieces along their 60cm edges to form a rectangular prism open on both ends. We have chosen to set the side pieces inside the front and back, so that the outside dimensions of the rectangular open ends are 40cm x 53.8cm (50cm + 19mm + 19mm). The inside dimensions of the full prism—and of the hay bales, once they’re finished—are 36.2cm (40cm – 19mm – 19mm) x 50 cm x 60cm.
4. Use glue and wood screws to hold together the plywood pieces. The thick 19mm plywood is necessary for the box to hold together at this step. If you add internal blocks as you might do with some projects, they will prevent the finished hay bale from slipping out of the box. Screw from the front and back into the sides, using two screws for each one of the four joins. Our screws are at 10cm and 34cm from the bottom of each 60cm side, but other locations would also work.
5. Designate either one of the two open ends to be the top of your box. Use a hand saw to cut two notches on the top side
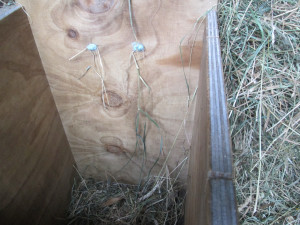
of each each of the side pieces (four notches total). These notches are meant to hold baling twine, and a hand saw will give you cuts large enough to easily insert the twine but small enough that the twine will stay in place.
6. To add rope handles, use a wide-bit drill to make two holes in the box’s front side and two holes in the back side. Our holes are 8cm from the top of the box and 15cm from either side of the box, leaving a centred 10cm gap between the holes.
7. Knot the end of a short piece of rope, then thread the unknotted end from the inside of the box to the outside through one of the drilled holes. Thread it back from outside to inside through its neighbouring hole, then tie another knot on the inside, leaving a loop of about 25cm for a handle. The knots need to be fat enough and tight enough to keep the handles from slipping through the drilled holes. Cut off any excess rope. Repeat with the other pair of holes.
Using the baling box
1. For each bale, cut two pieces of baling twine, each about 3m long.
2. Knot one end of a piece of baling twine. Slip it through one of the notches you’ve made on the top end of one side of your box. Pull until the knot catches in the notch: this will help it stay in place.
3. Lay your twine so that it falls down the first side of your baling box, then along the ground on the open-ended bottom of your box, then back up to the top of your second side. Secure the loose end of your twine in the notch opposite your starting point. Repeat steps 2 and 3 using the remaining notches and your second piece of twine.
4. Pack hay into your box, making sure to fill in the corners. Compress the hay as much as possible as you add it into your box.
5. Remove both ends of one piece of twine from the notches. Pull the knotted end so thatthe cut ends of the twine are centred over the open top end of the hay-packed box. Tie the twine tightly. Repeat with the second piece of twine. Your hay bale should now have two parallel ties around four of its six sides. This is enough to hold together a well-compacted haybale.
6. Face your baling box. Keeping one foot firmly on theground, use the other to step through the top of the box and hold the hay bale to the ground while you grip the handles and pull up so that the box starts lifting away from the hay bale. Once you’ve started, you can remove your foot and release the rest of the bale.
Caution
Our baling box requires personal strength to compress the hay. One obvious solution—standing in the box and stepping on the hay—requires steady balance. I like to hold onto something when I'm the one stomping. Also make sure your baling box is on flat ground to stand steady!
For alternative designs that make use of compression levers, search ‘hand hay balers’ on the Internet.